User experience is of utmost importance, and single page applications (SPAs) have become a popular choice for building interactive and dynamic web applications. React, a widely adopted JavaScript library, coupled with Vite, a lightning-fast build tool, offers a powerful development environment. And when you combine them with Sanity.io, a headless CMS (Content Management System), you have the perfect trio to create performant and scalable SPAs. These tools are also fairly easy to set up and get started with as a novice developer.
I will walk you through the process of setting up your own SPA using React, Vite, and Sanity.io. By the end of this tutorial, you will have a solid understanding of how to set up a development environment, create a React application using Vite, and integrate Sanity.io as your content management system.
Why React, Vite, and Sanity.io?
Before we dive into how to scaffold our app, I wanted to take a minute to explore why we might choose to use React, Vite, and Sanity together to create our project. There are a lot of options available when it comes to building SPAs, and React, Vite, and Sanity are just three tools you might choose to use.
Creating an application with React, Vite, and Sanity.io offers numerous advantages that can significantly enhance the development process and the overall user experience.
React provides a component-based architecture and a vast ecosystem of libraries, making it ideal for building reusable UI components and ensuring code maintainability. And with the decline of create-react-app as the default build environment, Vite offers a viable alternative for quick and optimized web applications.
Sanity.io serves as a powerful headless CMS, enabling efficient content management and seamless collaboration between developers and content creators.
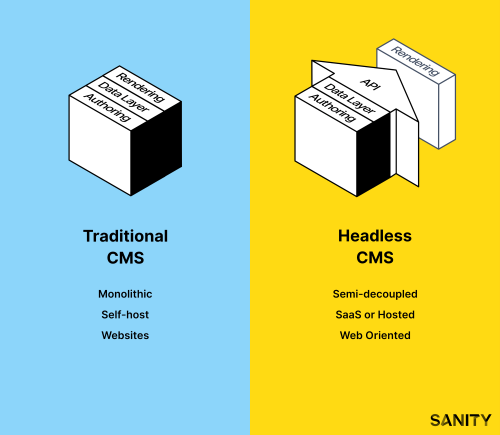
Together, these technologies allow developers a lot of control and scalability when building web applications. And, the setup process is rather simple. It doesn’t take a lot to get your app up and running.
A couple of notes before we get started:
- These instructions are for building an app on Windows using VSCode. The exact steps needed to build a project with another OS might vary a bit.
- I also prefer to use npm (as opposed to yarn). Keep this in mind as you go through the tutorial.
- This tutorial assumes you don’t have much experience with Sanity.io. If you have created projects already, this tutorial might not be for you.
Building a React App
The first step is to create a React app with Vite. This will be your front end. To get things set up, you should:
- Open a new terminal. I prefer working in the terminal in VSCode, but you can also do all of this in Bash or your preferred terminal.
- Navigate to where you’d like your new project to live. I have a folder called “coding practice” that I like to use for all things coding practice.
- In the terminal use the following command: npm create vite@latest my-react-app
- This command uses npm to create the application. The name of the application will be “my-react-app”, so you’re welcome to update that part of the command to whatever you’d like to name your app.
- You’ll be prompted to choose a development framework. For this tutorial, choose React. As you can see, though, you could create an app using any of the frameworks listed, or just vanilla JavaScript.

- You’ll also be asked whether you’d like to use Typescript or not. For this tutorial, I’ve chosen to not use Typescript, so I chose JavaScript.
Congratulations! You have a little baby React/Vite app!
Ok, so now we need to install all the dependencies we need to get our app working.
- Navigate into your new project folder: cd my-react-app
- Install the required dependencies: npm install
- Once installation is complete, you can run your application locally: npm run dev
The application includes default content at this point in the setup. You can delete or revise that content as you’d like. In this tutorial, I deleted all of the default content generated on installation.
At this point in the project set up, your file structure should look something like this:
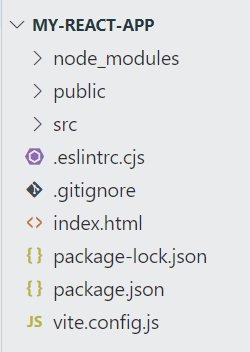
In the next step, we’ll start looking at Sanity and how to set up a new Sanity project.
Getting started with Sanity
Before you create a Sanity project, you’ll need to create an account. To create an account with Sanity, visit sanity.io and click “Get Started”. Fill in the relevant information about your account, and you’ll be ready to go! For this tutorial, I’ve used my Google account to log into my Sanity account. But you can create an account with Sanity and log in with a variety of credentials.
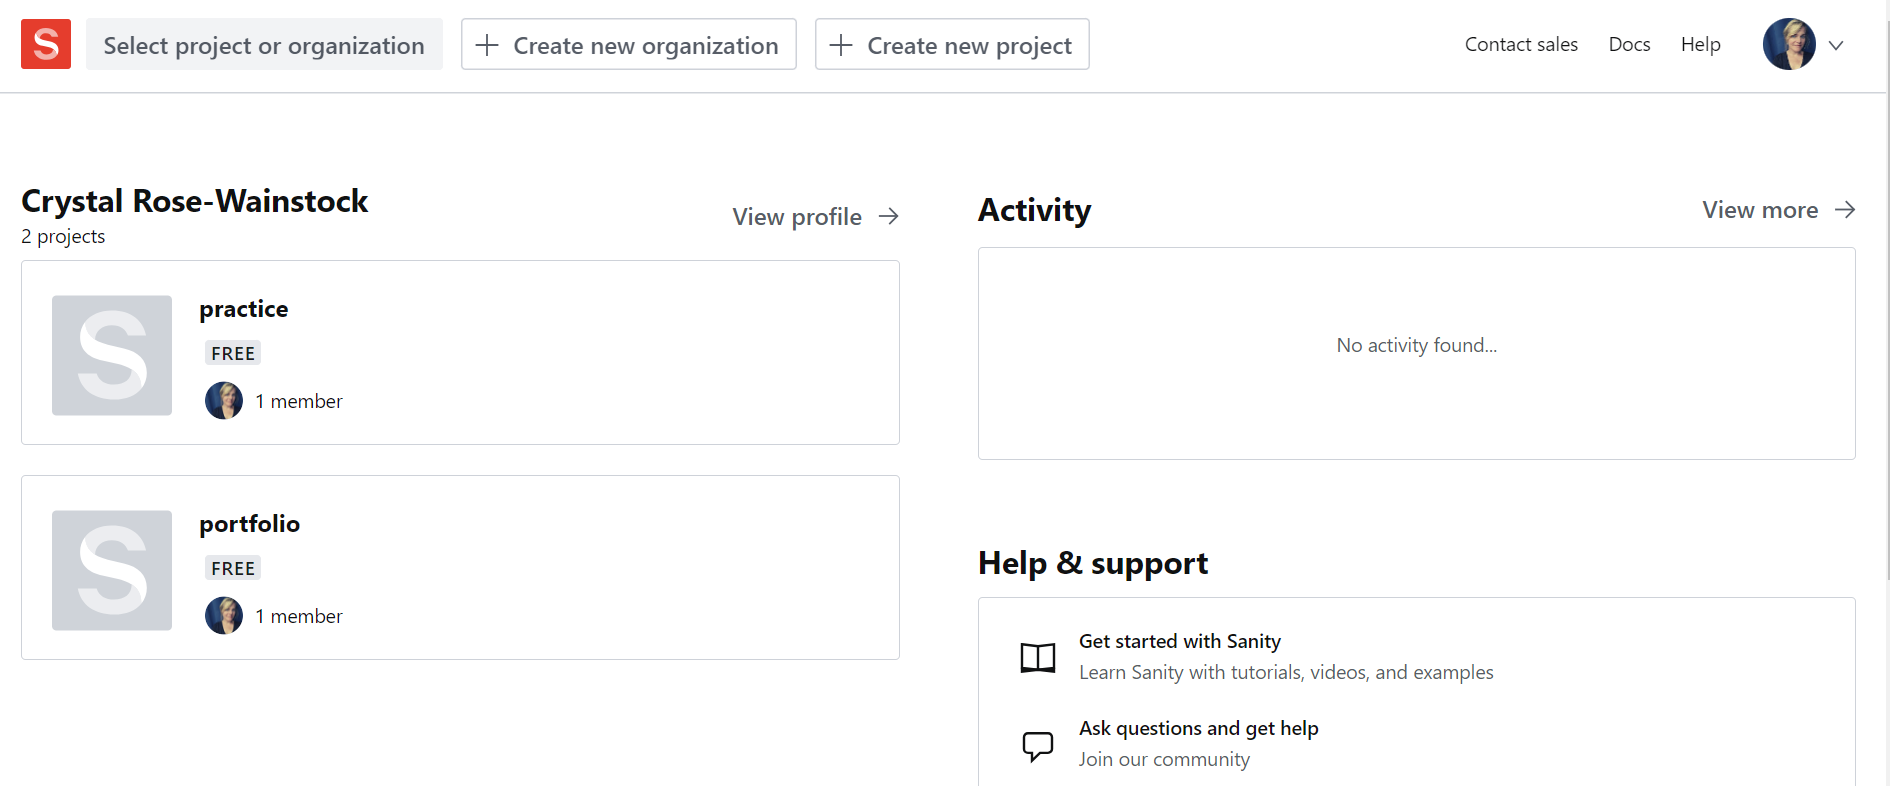
Once your Sanity account is created, you’ll have access to your Sanity dashboard at sanity.io/manage. This is where you can manage all of your projects. In the screenshot below, you can see my dashboard with two projects: practice and portfolio. Your dashboard will be empty, though, if you haven’t already created projects in Sanity.
Create a new Sanity project
Alright, it’s time to set up our new Sanity project. The content for our app will be managed in Sanity Studio. So the following instructions will get our new project up and running.
Something to consider during this part of the project scaffolding is what type of schema you need for your project. For this tutorial, I’ve chosen to create a Sanity project with the default “Movie project” schema and sample data. But there are other options with different file configurations that might be more useful for your project. For instance, the blog schema is useful for a blog and portfolio app setup.
Before we get too carried away with schemas, let’s create our new Sanity project.
- First, install the Sanity CLI: npm install -g @sanity/client
- You’ll be asked to log into your Sanity account. If you choose to use Google or GitHub, a browser window should open where you can log in.

Once you’re logged in, you can go back to your terminal and continue to set up your new Sanity project.
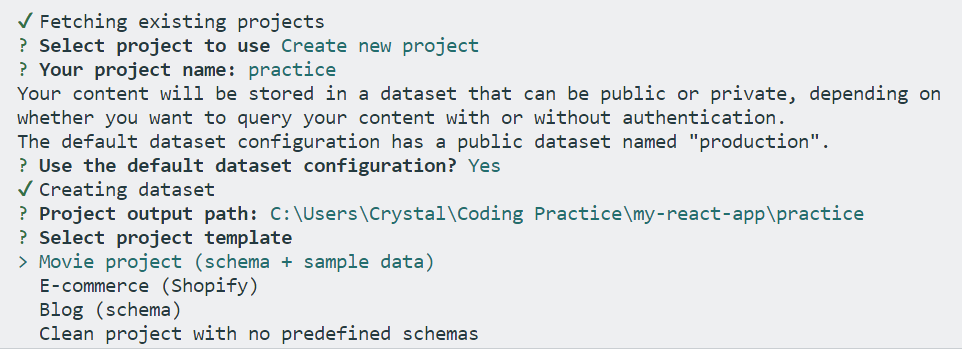
- Create your new project in Sanity: npm create sanity@latest
- Here you can create a new project or choose an existing project if you’ve already created one in your Sanity dashboard. In the screenshot below, you can see I have an existing project called “portfolio”. For this tutorial, I’ve chosen to create a new project here.
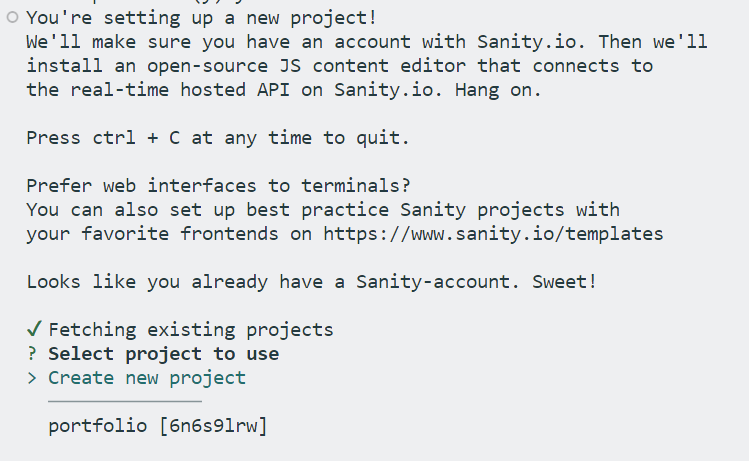
- Follow the prompts to set up your project. You’ll need to name your new project and then choose which type of dataset to use. For this tutorial, I’ve used the default “production” setup, and my project is named “practice.”
- This is where you can also choose which schema (if any) you’d like to use for your project. As previously mentioned, this tutorial uses the “Movie project” schema because it also includes sample data to work with.
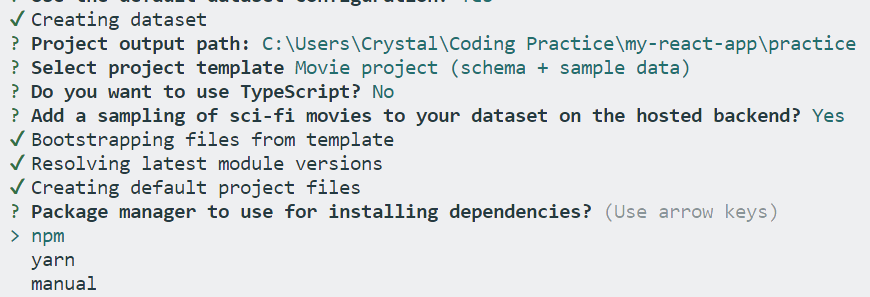
During this setup process, you’ll also be asked which package manager you prefer for dealing with dependencies. I already mentioned that I prefer npm, but this is where you could also choose Yarn or manage your packages manually.
At this point, your Sanity project has been created. Yay! If you go to your Sanity dashboard, you’ll see your new project. There’s not much to see yet, but it’s coming together! Your file structure should now look something like this:
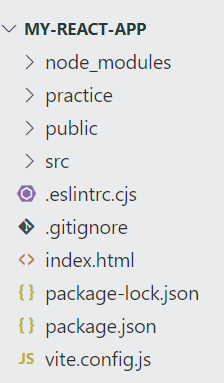
The Sanity project files have been added to your React app. My project is called “practice”, so all of my Sanity files can be located in the practice folder. We’ll take a closer look at these files in a little bit. But first! Let’s start up our Sanity Studio.
Starting Sanity Studio
Now that our new Sanity project has been created, we can launch our Sanity Studio. This is where we can add and revise content for our app.
- Open a new terminal.
- Navigate into your new Sanity project file: cd .\practice\
- Run your app locally: npm run dev

Your Sanity Studio should now be available locally. If you access localhost:3333 in your browser, you’ll see your new studio!
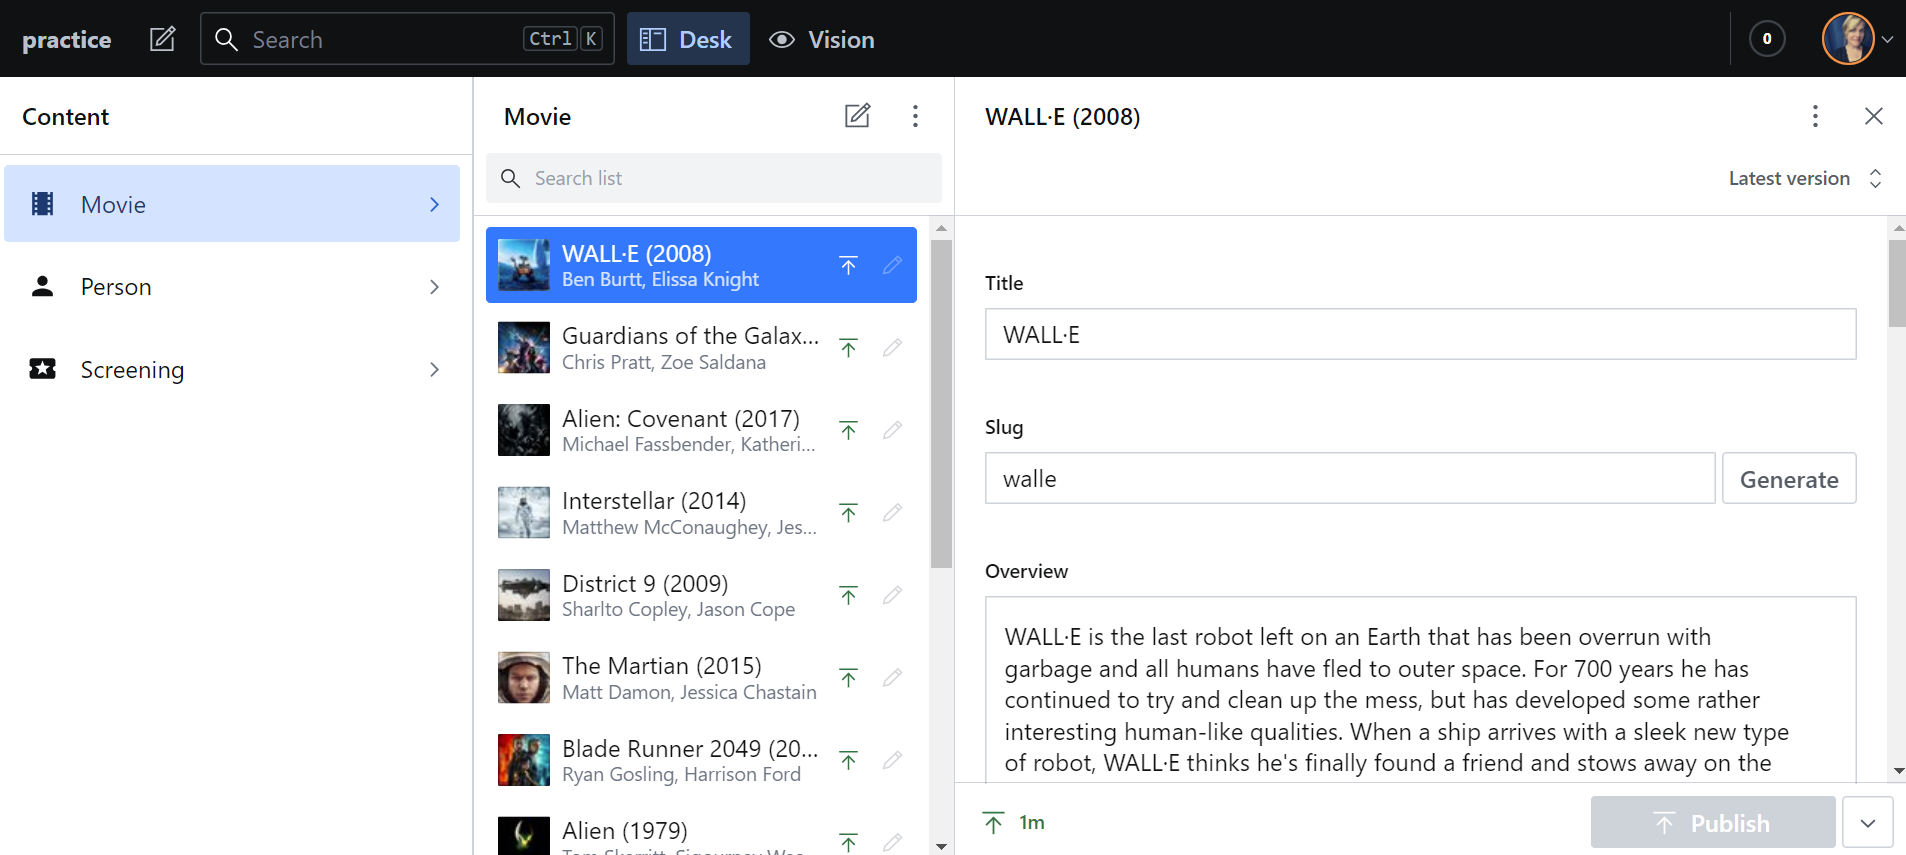
This is where you can add, delete, and edit the content for your app. With the “Movie project” schema we used in this tutorial, you get pre-populated sample data for a bunch of movies. The content fields are also defaults for the schema. But, all of the content and content fields are customizable. When building your schema, you can manually create or delete fields for content in the schema files.
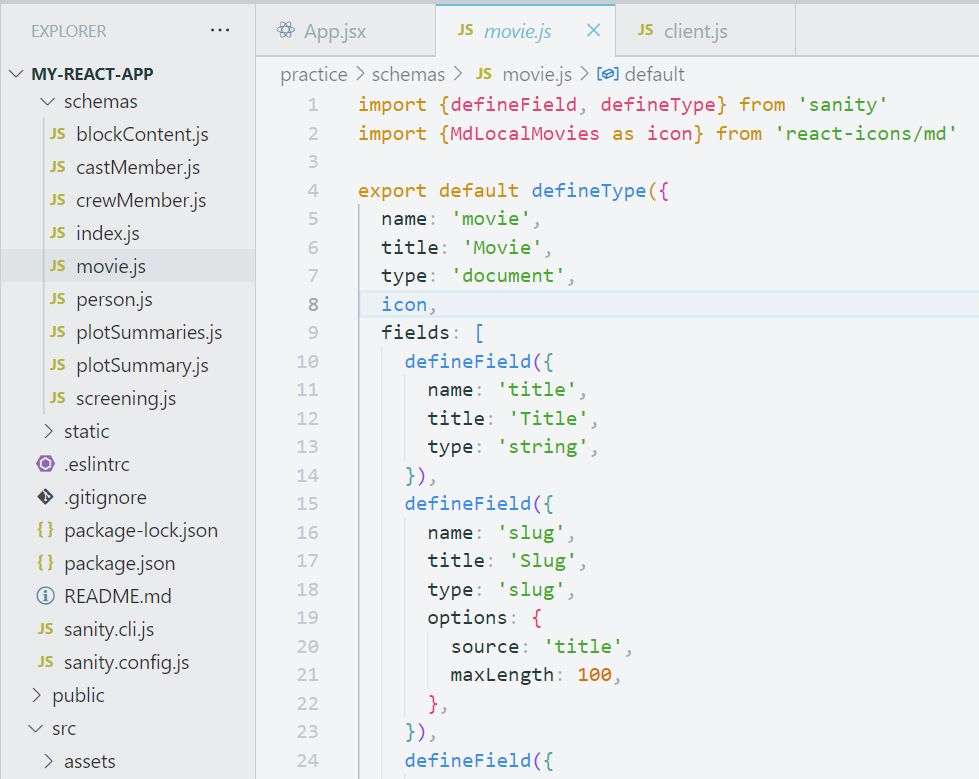
For instance, the movie.js file in the shema folder includes all of the fields you see in the Sanity Studio (Title, Slug, Overview). Sanity Studio is really quite versatile, and the topic of building and customizing schemas could really be its own blog post. You can learn more about creating and customizing these fields in the Sanity documentation.
Whew! Ok. We have our frontend React app put together. And now our Sanity Studio is ready to go. The next step is to make sure React and Sanity are communicating properly so we can access the data in Sanity from our React app.
Connecting React and Sanity
The first thing we need to do is to give our React app permission to access the data we have in our Sanity project. To do this, we need to update some information in our Sanity dashboard. First, a note: you can customize a lot of things in your Sanity dashboard, but the scope of this tutorial is quite limited. Please feel free to revisit your dashboard to see what kinds of information is available and what kinds of things you can manage for your app through the dashboard.
Ok, to give our React app permission to access our data, do the following:
- Visit sanity.io/manage to see your dashboard.
- Click on your project to see the overview of your project.
- Click “Settings” in the menu.
- Open the “API Settings” in the side menu on the left.
- Click “CORS Origins” in the left menu.
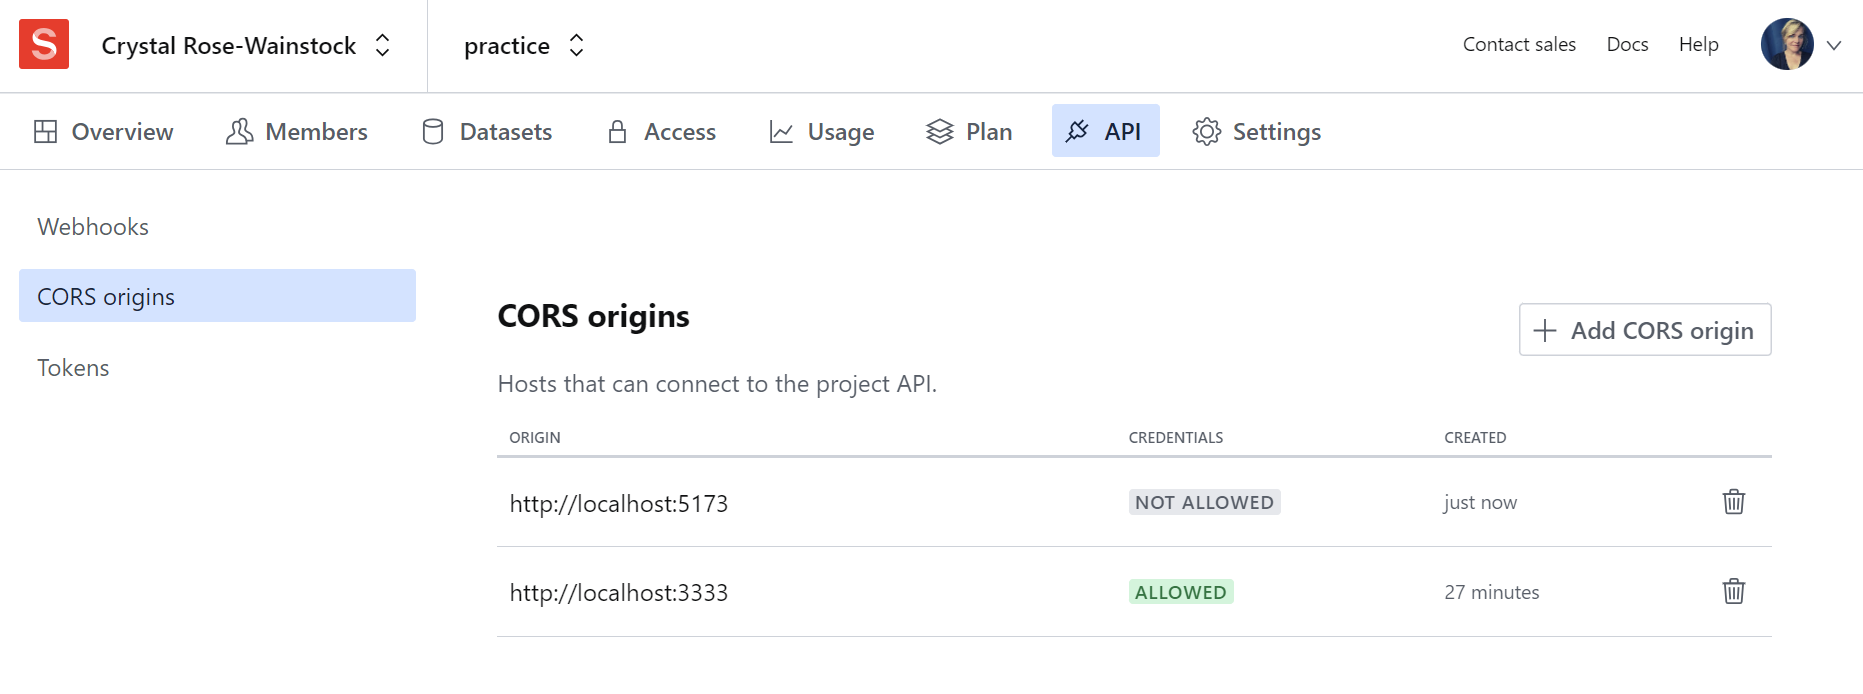
- Click “Add CORS Origin”.
- Enter the localhost URL that you’ll use for production. The default for our React app is localhost:5173. Make sure you enter the URL as: http://localhost:5173 If you use https, you’ll get an error.
- This is where you’ll also enter any URLs used if you deploy your app.
- Click “Save” to add your URL to your CORS Origins.
Your React app should now have permission to access your data in Sanity. If you change your localhost for any reason, you’ll need to update it here in the Sanity dashboard as well.
Creating an instance of Sanity Client
In your React app, you’ll need to fetch data from your Sanity project. While our app has permission to access the data, we need an instance of the sanityClient to fully connect our frontend and our data in Sanity.
To create an instance of sanityClient, you need to:
- Create a new file called client.js in your src folder.
- In this file, you’ll need to import createClient from the Sanity client. You’ll also need to create an instance of the client with the specific project information for your project. Your client.js file should look like this:
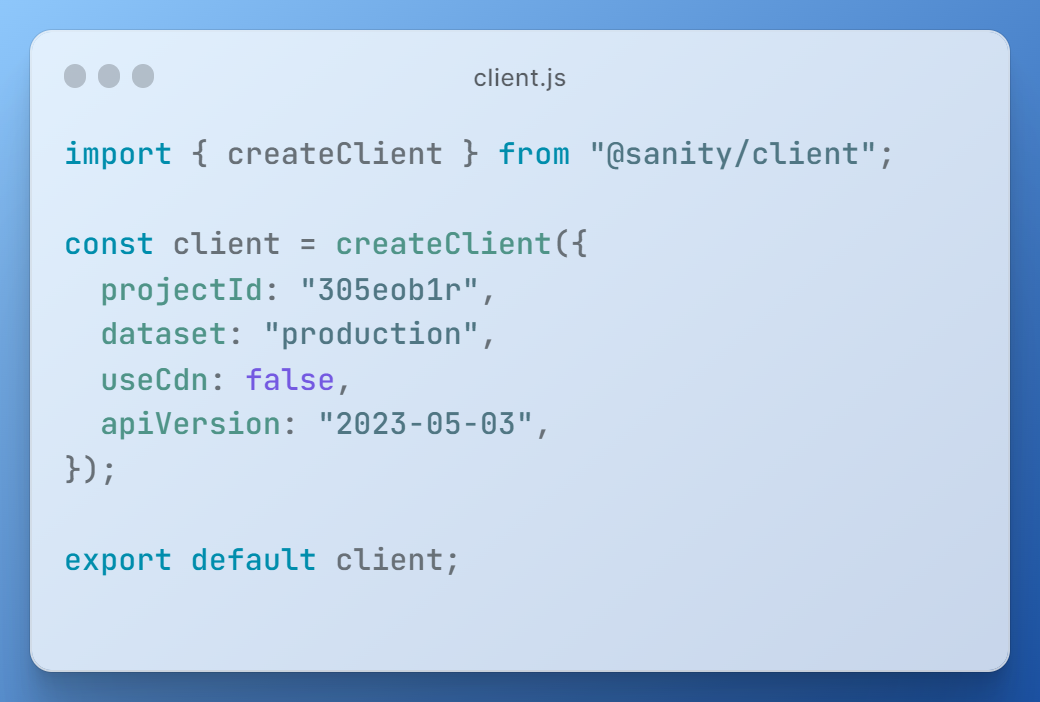
- Update the projectId and the dataset values to match your Sanity project. You can find the projectId and dataset either in the sanity.config.js file or in your Sanity project dashboard online.
- You can learn more about setting up the Sanity Client in the Sanity documentation.
Sweet! So, your project now has a line of communication between your React app and your Sanity project. The final step to accessing data from your Sanity project is to actually fetch the data you need in your app.
Fetching your data from Sanity
Alright, we’re finally to the point where we can use the data in our Sanity project. Now, depending on your project, of course, how you use this data will vary. And you’ll likely have multiple components and pages in your app that might use the data in different ways.
For the purposes of this tutorial, we’ll keep things simple. Instead of building out multiple pages or components, we’ll just access our data from the App.jsx file. The good news is that you’ll access the data the same way, more or less, whether you use one file or multiple files.
I’ve also chosen to use useState and useEffect hooks in my React app to manage the data we get from Sanity. You might also choose to manage the data in a different way, using loaders or actions in React Router 6, for instance. And I’ve used the .fetch().then().catch() syntax to fetch the data. You could also use an asynchronous function and a try/catch block with await. As with most things, there are multiple ways to achieve our desired outcome.
A couple of things to note about fetching data from Sanity:
- Sanity uses GROQ to query your data. The documentation has a lot of great examples and code you can play around with to learn about using it effectively in your projects.
- You can see more or less what data will be available to you from your Sanity project in the schema files. We looked at the movie.js example, but there are other schema files in the project as well. Each contains the outline of the types and structure of the data in your Sanity project.
Ok. Let’s get into it a bit.
To access your data from Sanity, you need to:
- Import sanityClient from your client.js file
- Fetch the data from Sanity
- Update your state to include the new data
- Map over the data in your state variable and render as you’d like
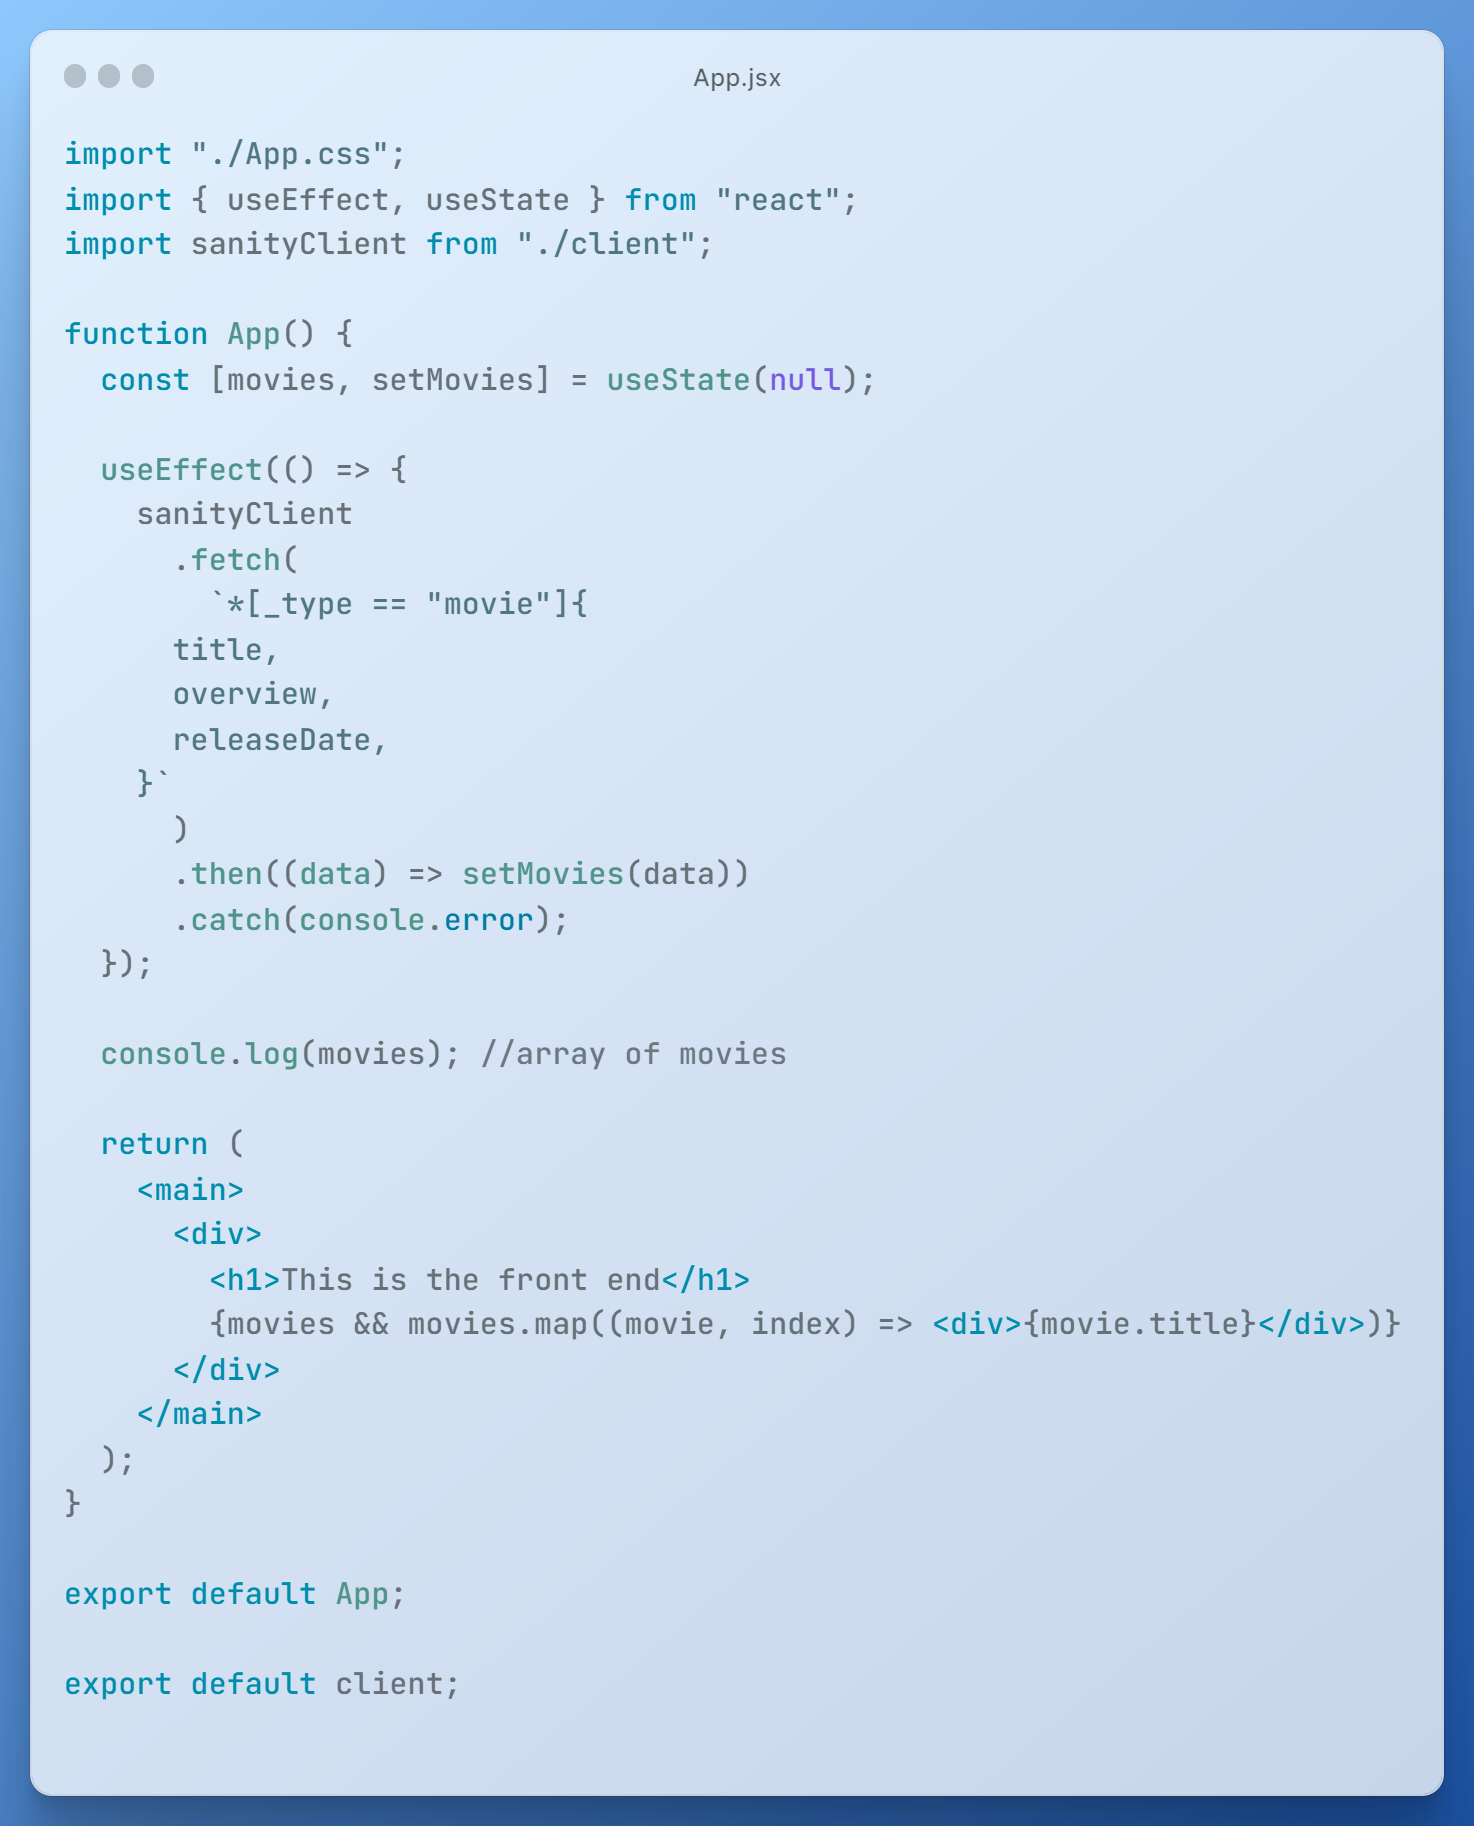
In my example, I’ve chosen to fetch all data with the type “movie.” Specifically, I’ve chosen to get the title, overview, and releaseDate from the data. Again, you can access any of the data available by selecting it here in your fetch. You can see the data structure available, more or less, in the schema files in your project. The GROQ documentation is a great resource for this type of exercise.
In the snippet below, you will see my App.jsx code where I’ve done the things outlined above. In my app, I’ve opted to just render the movie titles. But, you can hopefully see how you might include other pieces of data in your app.
In my useEffect, I use .fetch() syntax to query my dataset in Sanity. If data is returned, I then set the movies state variable with that data. Otherwise, I use .catch() to log an error.
I’ve also used the console to see what the data looks like in my console.log. This is, of course, optional, but it’s a nice way to explore the data to see what you might render in your return.
In my return, I’ve basically said that if there is data in the movie state variable, I want to go over each element in the data and render the movie.title. The index isn’t currently being used, but this might be useful for creating unique keys for the data being rendered if more complex data is rendered.
My app now renders the titles of all the movies in my Sanity project dataset, and it looks like this in my browser:
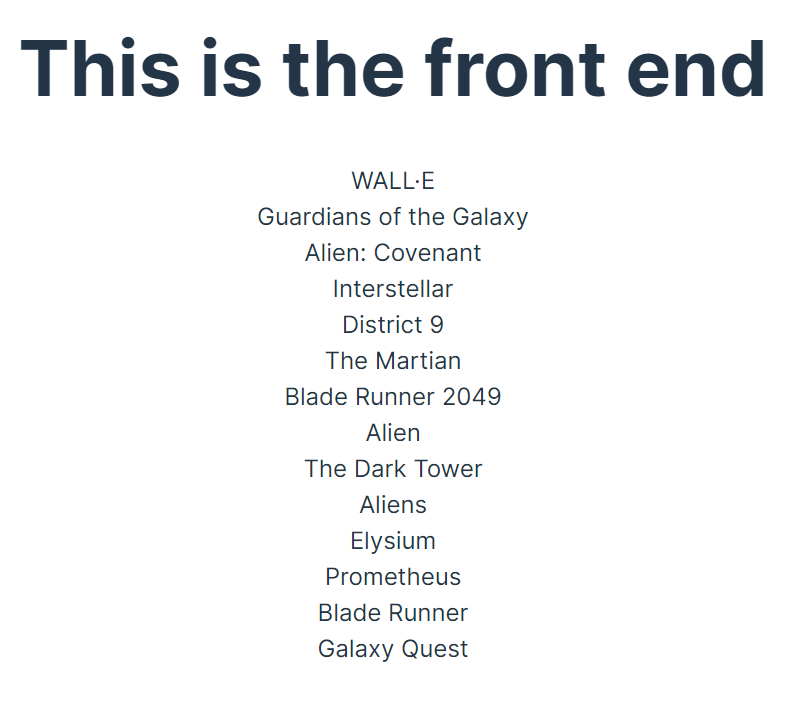
My movie app isn’t super cute, but I’ve managed to get my React, Vite, and Sanity project set up!
Congratulations! Hopefully you’ve managed to work your way through this tutorial and you have a cute little baby movie app built with React, Vite, and Sanity.io.
In this tutorial, we’ve explored React, Vite, and Sanity.io as tools to build a single page application. We went through the steps to set up a fresh, new React app. We created a new Sanity project. And we made sure that our React app and Sanity project communicate. Finally, we rendered some of our data from our Sanity project in our app.
I hope you’ve found this tutorial to be useful! Keep in mind that technology changes constantly, and some of the steps in this setup process might change by the time you encounter this tutorial. The Sanity documentation, as well as the React documentation, are both amazing resources with the most up-to-date information about best practices.
